Sign Up with Epic Games


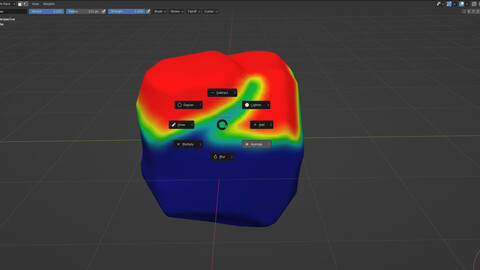
WP pie menuWP pie menu is an addon made for Blender meant to help you change your Weight Paint Brushes faster.Installation
Just like any addon, you can install it by going to the Addons tab in the User Preferences window, clicking install and then locate the addon zip file and at last click Install Add-on.
How to useAfter installing the addon, you can use it by pressing the D key on your keyboard. It will open a pie menu with the following options:
- Draw: This will set the current brush to Draw.
- Add: This will set the current brush to Add.
- Subtract: This will set the current brush to Subtract.
- Multiply: This will set the current brush to Multiply.
- Lighten: This will set the current brush to Lighten.
- Darken: This will set the current brush to Darken.
- Blur: This will set the current brush to Blur.
- Average: This will set the current brush to Average.
To access brush settings, you can use the SHIFT + D key combination. It will open a pie menu with the following options:
- Weight: This will set the weight value.
- Strength: This will set the strength value.
- Accumulate: This will toggle the accumulate option.
- Front Face: This will toggle the front face option.
The quick options Piemenu can be accessed by pressing the X key on your keyboard. It will open a pie menu with the following options:
- Bone Visibility: This will toggle the bones visibility. Note: Remember to make the bones visible again after using this option.
- Auto Normalize: This will toggle the auto normalize option.
- Multi Paint: This will toggle the multi paint option.
- Mirror Vertex Groups: This will toggle the mirror vertex groups option.
- Mirror X: This will toggle the mirror X option. Note: Only mirror X is available for now.
- Mirror Topology: This will toggle the mirror topology option.
The shortcuts can be changed in the keymap preferences under the 3D View tab.
In the WPM 3D View Panel, you can now change the order of the brushes in the pie menu and also remove them. You can also add brushes and change the current selected brush on the list by changing the brush shown in the Brush option right bellow the panel.
Future plans- Get feedback from users to improve the addon.
Created by Telergy Studio.
YouTube channel: Telergy Studio
Instagram: @telergystudio
Release Notes
To access brush settings, you can use the SHIFT + D key combination. It will open a pie menu with the following options:
- Weight: This will set the weight value.
- Strength: This will set the strength value.
- Accumulate: This will toggle the accumulate option.
- Front Face: This will toggle the front face option.
The quick options Piemenu can be accessed by pressing the X key on your keyboard. It will open a pie menu with the following options:
- Bone Visibility: This will toggle the bones visibility. Note: Remember to make the bones visible again after using this option.
- Auto Normalize: This will toggle the auto normalize option.
- Multi Paint: This will toggle the multi paint option.
- Mirror Vertex Groups: This will toggle the mirror vertex groups option.
- Mirror X: This will toggle the mirror X option. Note: Only mirror X is available for now.
- Mirror Topology: This will toggle the mirror topology option.
The shortcuts can be changed in the keymap preferences under the 3D View tab.
In the WPM 3D View Panel, you can now change the order of the brushes in the pie menu and also remove them. You can also add brushes and change the current selected brush on the list by changing the brush shown in the Brush option right bellow the panel.
Future plans
- Get feedback from users to improve the addon.
CATEGORIES
Extended Use License
Free
License: Extended Commercial License
Stock Assets
For use on an unlimited number of commercial projects with no limits on sales or views.
Learn MoreFiles (1)
https://artstn.co/m/P3Nk9
Copied
More by Telergy Studio

Add a tip for Telergy Studio
Tips are appreciated, but optional!